By Digital Smile Design
⋅ 5 min read
⋅ Updated Jan, 2025
If you’re thinking about investing in 3D printing technology for your dental office, it can be hard to know where to start.
What are the different types available, how can you figure out which one is right for your specific clinic needs – and do you even need an in-house printer anyway?
We asked George Cabanas, DSD partner and digital technology expert, to answer some key questions about 3D printing and its applications for dental offices.
How does the 3D printing process work?
As 3D printing advances, every day we have more and more tools to allow us as clinicians to provide fantastic solutions for our patients. But how does the process work exactly? George explains: “It is an additive manufacturing process of making three dimensional solid objects from a digital file. We add resin to build up the model or the appliance that we're manufacturing, in contrast to milling, which is more classical in the dental field. Milling is basically removing excess material to discover the crown, the structure that is within a solid piece of material, while 3D printing is the opposite. It deposits or photo cures a composite resin to build up layer by layer and manufacture the actual appliance itself.”
In dentistry, there are two major types of printing: photo curing of resins and fused deposition. From a practical and a clinical point of view, photo curing of resins is more practical for dental applications.
What are the different types of 3D printers used in dentistry?
There are four main types of 3D printers used in dentistry, the most common being Stereolithography (SLAs) and Digital Light Processing (DLP).
Photopolymer Jetting (PJ)
- A liquid resin is injected through a printing head and built up layer by layer
- Conceptually the same as a paper printer –but three dimensional
- Very good for high production
- A PolyJet can print a model that has hard tissue and soft tissue coloring
- Not the best for very precise guides
Fused Deposition Modelling (FDM)
- Tremendous variety – from the hobbyist to the professional grade printers
- Solid extrusion of a plastic wire that is used to manufacture the appliance
Stereolithography (SLA)
- One of the main two types of printers that are used in dentistry as a whole
- Workhorse for clinical use
- A laser photo cures the specific pattern of liquid resin, building up the appliance layer by layer
Digital Light Processing (DLP)
- Used extensively in dentistry
- Relatively inexpensive, very fast and reasonably accurate
What are the uses of 3D printing in a dental office?
What exactly are the applications of 3D printing in dentistry, and what could you do in your own office? George describes some of the main uses:
“We started off printing models. We first started off with models that were valid for diagnosis, but they weren't yet capable of being used for prosthetic restoration, whether they be fixed or implant-restored restorations. But today's line of printers are able to do all types of models, specifically a Geller type of model. The higher end printers are able to manufacture a precise Geller model, implant restorative models and shells, which are try-in composite veneers.
We can print not only surgical guides, but our double crown lengthening guides. Our double crown lengthening guides help the surgeon in adequately profiling both the soft and hard tissue of the crown. We can generate provisionals and immediate loading prosthesis. So for surgical cases we can print those prostheses.
Now we can do fully digital dentures, where we can print in one resin the pink portion of a denture, and in another resin tooth-shaded teeth. So we're now able to print those two separately, and then bond them together with resin. For orthodontics, we can do indirect bonding trays to help the orthodontist place the brackets more precisely and quickly.”
There is also the DSD Clic Guide, which is a set of appliances that help the surgeon to precisely guide the implant intervention.
How can you select the right 3D printer for your dental office?
There are different factors to take into account when choosing a printer for your clinic, rather than a lab. But how do you know what to look for? George highlights a few of the main things to think about when it comes to choosing the right printer for your dental office:
You need the complete solution
It’s not just the printer you need; in order to have a complete solution in your clinic, you also need the suite of appliances that come with it.
This includes the software for that specific printer; the special bathing or washing station to clean the printed product before the patient receives it; and the post curing: after the model comes out of the printer it needs to be cured for around half an hour in a temperature-controlled curing oven. You also need a computer to be able to prepare the work for the printer.
You have to think about available resins
Depending on what you plan to print in your dental clinic, you also need to look at the resins you need and the printers that can be used with them. For example, if you only want to print study models or mock-up models, many printers can satisfy that. If you want to print the DSD Clic Guide or a definitive veneer, however, you need to look for the specific resin and a printer that can be used with it.
You need to have space in your clinic
It’s important to make sure you have enough space in your clinic: for the printer, computer, cleaning station, and post-curing oven station and an area for finishing the appliance.
You need to have post-sales support and training
At the end of the day printers are machines – they break, they need maintenance and there are software updates. For these sophisticated machines you need good post-sale support; for clinical use, you need a reputable supplier that you know will be there to give you that training and support.
You have to have a designated person for printing tasks
George highlights that if you’re using the printer for models and other simple items, any of your staff members in your dental office should be able to operate it. It’s important that this designated person has the role assigned to them and receives the training they need.
How do you choose between the different 3D printers available?
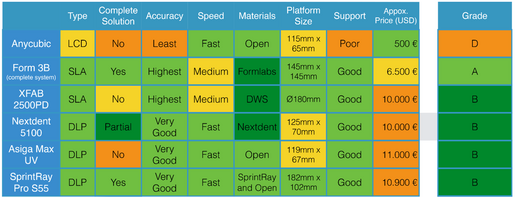
In the table below, George evaluates six common printers used in dentistry depending on their speed, accuracy, price and other factors. While he believes that any of the lower four options are perfect for clinical use, it’s the Formlabs Dental option he would recommend for all-round use in a dental office.
What do clinics most like to use 3D printers for?
George explains that for clinics, the most common uses of the 3D printer are to make mock-up models, shells, and surgical guides. “The first thing is the mock-up models. That's the very first thing. That's where they generally start. The next step is the shells. So those are two of the types of things that were printed. The next thing that we see are surgical guides. Surgical guides are one of the first items that 3D printers are used for. So surgical guides, it's a mature technology for 3D printing.”
Is it easy to 3D print these devices in your clinic or do you need a specialized lab for those types of things?
George explains that these appliances can be printed perfectly in a clinic from the DSD Planning Center.
“The complex part is the design aspect, but once you have the design, you can give instructions on how to print it. Since you are buying commercially available resins the material already has the approval of your local health authority. 3D printing can be performed anywhere in the world and have all the appropriate health approvals. In the clinic, knowing the type of clinic that you are - if you're an ortho or surgical or restorative clinic, and depending on the types of disciplines that you frequently employ in your clinic - you can have on-hand the resins that you most commonly use.”
How can we benefit patients using 3D technology and 3D printing?
There are so many ways that 3D technology and 3D printing technology in particular can be applied in dental clinic workflows to benefit patients. George explains:
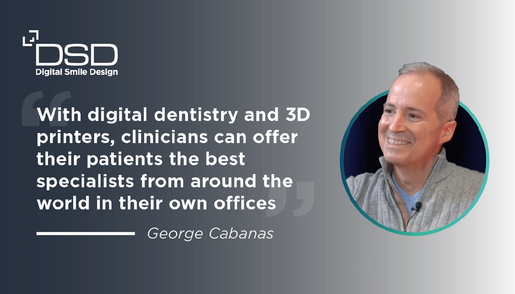
“One of the great things that digital dentistry as a whole offers to the clinician and to their patient is now you have the clinician not alone when they’re treatment planning; they have access to the DSD Planning Center where there are specialists that can help clinicians in different disciplines: design, help in the treatment planning, and then design the different appliances that can be printed locally. With digital dentistry and the 3D printer specifically, clinicians can offer their patients the best specialists from around the world in their own office, with no need to send it from different parts of the world.
In the office itself, the try-in, the pre-acceptance appliances can all be manufactured locally. So the clinician can offer the client, the patient, the best specialists from around the world in treatment planning and in appliance design. It really opens up tremendous opportunities for clinicians and patients.”
How important is the post-printing process?
How important is the post-printing process?
“The post-printing process takes time, so cleaning can take 10 to 15 minutes. The photo curing post is another 30 minutes, so it can take 45 to 60 minutes of time. It's true that you do not have to be operating the machine during that time, but somebody on your team has to be aware of it.”
Can we see the difference between 50 microns, 100 microns or 200 microns? In a good 3D printer, what is the average micron that you use to print for good quality?
Can we see the difference between 50 microns, 100 microns or 200 microns? In a good 3D printer, what is the average micron that you use to print for good quality?
George explains the meaning of micron in 3D printing and how they can affect the quality of your printed product:
“With a micron, you're referring to the vertical height of each printed layer. Good printers can print at 50 microns. They can even go down to 25 depending on your application. If you are manufacturing a very precise Geller model, you may want to print at 25 microns. What happens is the more layers you have, the more time it takes to print the model. So there's a consideration there as printing takes time to manufacture, and if you go from 50 microns to 25 microns, you have basically doubled the time it will take to manufacture.
If you are printing a night guard, you may want to print at 100 microns or 150 microns because you're not talking about a perfectly fitted crown. You're talking about an appliance that has some tolerances. If you're printing a model that you're going to use for an implant restoration, you want it to be as precise as possible. So it depends on your use.
Most models are printed between 50 microns and 100 microns. The general consensus is between those two. The main difference between using 50 or 100 is the specific printer you're using. We use 50 microns for most of our models.”
Can we do a no-prep veneer with this, and what is the minimum thickness we are looking at?
“With the no-prep veneers, these materials are for provisional, they are not for definitive use. There are new definitive esthetic resins that can be used for no-prep. They also work well with traditional prepped veneers.
To clinically place the 3D printed restoration, you basically etch it and then use your adhesive to be able to bond them. And what's great is that since these are composite materials, you can always repair them chairside. No longer do you have to remove it, send it to the lab and have the lab repair it. You can repair chairside with the instruments that you have at hand.”
Watch the roundtable
To learn more about how you can successfully bring 3D printing workflows in house, as well as the important aspects to consider when it comes to choosing the right 3D printer for your dental office needs, you can catch the full replay of our roundtable discussion here:


