What Your Scanner Company Won't Tell You About Scanning
Why 95% of intraoral scans fall short of ideal — and the technique, verification habits, and lab-awareness that separate the top 5% from everyone else.

Table of Contents ▼
- Why 95% of Intraoral Scans Fall Short
- Bite Registration Errors: The #1 Hidden Cause of Remakes
- The Complete Patient Avatar: 5 Vital Scan Components
- Full Arch Implant Scanning: Why No Scanner Can Guarantee Passive Fit
- 15 Common Intraoral Scanning Mistakes Labs See Every Day
- Soft Tissue Scanning: The Missing Ingredient for Aesthetic Restorations
- How to Master Your Intraoral Scanner — Regardless of Brand
- The IOS Festival: The World's Only Course Dedicated to Scanner Mastery
- Frequently Asked Questions
Why 95% of Intraoral Scans Fall Short: The Problem Nobody Talks About
Here's something most labs won't tell you: less than 5% of the scans they receive are truly ideal. Not "unusable." Not "rejected." Just... not ideal. The other 95% require workarounds, assumptions, or compromises that affect the final result.
The Lab Owner's Perspective
At DSD, we've analyzed over 10,000 scans from dentists around the world. We see everything — the good, the mediocre, and the "how did they think this would work?"
And here's what we've learned: the difference between a good scan and a great scan isn't the scanner. It's technique. It's knowing what to check before you hit send. It's understanding what happens on our end when your file arrives.
The Real Cost
Poor scanning is expensive. Not just in remakes — though those add up — but in chair time spent adjusting restorations that "almost" fit, patient trust eroded by multiple appointments, lab relationships strained by finger-pointing, and your own confidence undermined by unpredictable results.
The frustrating part? Most of these issues are preventable.
Ask your lab a simple question: "What percentage of my scans require workarounds?" Their honest answer may surprise you — and it's the fastest path to improvement.
The Complete Patient Avatar: 5 Vital Scan Components
A crown scan isn't just about the prep. For truly predictable results — especially in esthetic cases — we need a complete patient avatar.
The 5 Components
- Intraoral static
- Intraoral motion
- Facial static
- Facial motion
- Inner tissues
The File Matching Challenge
When different scans are captured at different times (prep, bite, facial scan), they need to be matched together. This is where problems compound. If your scan extension is insufficient, we can't reliably match files. If landmarks don't align, we're making assumptions.
New Solutions
Tools like Qlone Dental and ModJaw are making it easier to capture complete patient avatars with accurate file matching. The technology is advancing rapidly. But regardless of tools, understanding what a complete avatar requires is the first step.
Jaw tracking with tools such as ModJaw.
Full Arch Implant Scanning: Why No Scanner Can Guarantee Passive Fit
Full arch implant cases represent the most challenging intraoral scanning scenario because no current scanner — regardless of brand or price — can reliably capture full arch implant positions with the accuracy required for passive fit, due to cumulative stitching distortion across the arch.
The Physics Problem
Intraoral scanners work by stitching together thousands of small images. Each individual scan is accurate. But as you move across a full arch, micro-distortions accumulate. By the time you've scanned from second molar to second molar, those tiny errors have compounded into measurable deviation. For single crowns or small bridges, this doesn't matter. The error is within tolerance. For splinted implants across a full arch, it's the difference between a restoration that seats passively and one that rocks, gaps, or causes screw loosening over time.
The Solution — Photogrammetry Verification
Photogrammetry uses fixed reference points and triangulation to capture implant positions with laboratory-level accuracy. It doesn't accumulate stitching errors because it's not stitching — it's measuring absolute positions.
You don't need expensive dedicated equipment anymore. Smartphone-based photogrammetry solutions like PIC Dental turn your iPhone into a verification tool. The technology has become remarkably accessible.
Our Recommendation
For any case with 4 or more implants, verify with photogrammetry. Use your intraoral scanner for what it does brilliantly: capturing soft tissue, emergence profile, opposing arch, and bite. Let photogrammetry handle the implant positions.
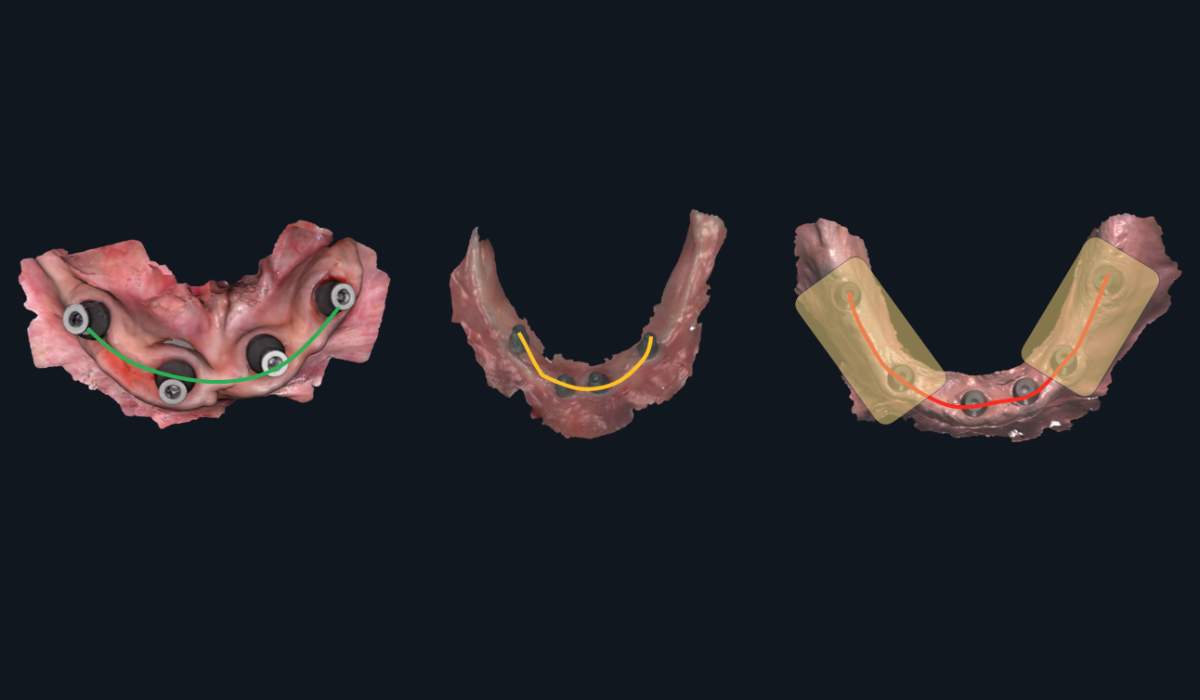
Full arch implant scanning: where cumulative stitching error becomes clinically significant
Passive Fit: A prosthetic framework that seats on implants without inducing strain — no rocking, no gaps, no screw loosening. Achieving passive fit in full-arch cases requires implant position accuracy that exceeds what stitching-based scanners can deliver.
15 Common Intraoral Scanning Mistakes Labs See Every Day
Based on reviewing thousands of cases, here are the 15 most common issues we see—organized by category:
| # | Scan Error | Category |
|---|---|---|
| 1 | Low mesh resolution / insufficient surface detail | Mesh Quality |
| 2 | Blur or distortion in critical areas | Mesh Quality |
| 3 | Mesh crash (holes) near margins | Mesh Quality |
| 4 | Unclear or blurry finishing lines | Margins & Prep |
| 5 | Insufficient clearance (occlusal, interproximal, or outline) | Margins & Prep |
| 6 | Path of insertion not verified | Margins & Prep |
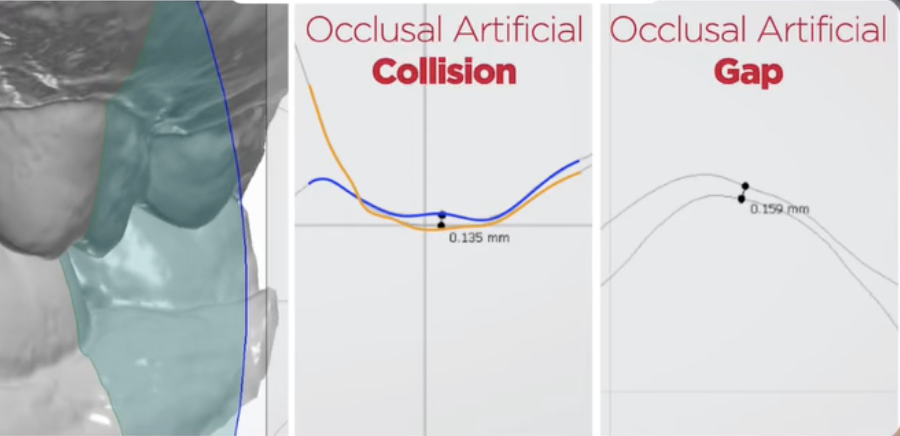
| 7 | Occlusal collision (mesh penetration) | Bite Registration |
| 8 | Occlusal gaps (false separation) | Bite Registration |
| 9 | No sagittal verification performed | Bite Registration |
| 10 | Missing gingival architecture (esthetic cases) | Soft Tissue & Context |
| 11 | Provisionals not scanned when applicable | Soft Tissue & Context |
| 12 | Insufficient scan extension for file matching | Soft Tissue & Context |
| 13 | Scan body positioning issues | Implant Cases |
| 14 | No photogrammetry verification (4+ implants) | Implant Cases |
| 15 | CBCT-to-STL alignment not confirmed | Implant Cases |
Which Ones Are You Committing?
Most dentists unknowingly make 3-5 of these errors regularly. Some are making more.
The first step to better outcomes is knowing where you stand.
Print out the checklist version of these 15 checkpoints and keep it at your scanning station. Running through it before every case takes 30 seconds and saves hours of rework.
Why Gingival Information Matters
For posterior crowns, soft tissue information is nice to have.
For anterior esthetics, it's essential.
The difference between a crown that "fits" and one that looks naturally emerged from the gingiva is soft tissue data.
Emergence Profile
Emergence profile—the way the crown transitions from the implant or root to the visible tooth—can make or break anterior aesthetics.
Without gingival architecture data, we're guessing at emergence. With it, we can design restorations that look like they grew there.
How to Capture It
For esthetic cases, scan the provisional in place. This gives us:
- The gingival contour the tissue has adapted to
- The emergence profile that works in the patient's mouth
- A template for the final restoration
Then scan the prepared tooth. The combination gives us everything we need.
The Provisional-to-Lab Workflow
- Place provisional, allow tissue to adapt (if needed)
- Scan provisional in place
- Remove provisional, scan preparation
- Send both scans with clear labeling
This extra step adds minutes to your workflow and transforms your esthetic results.
Emergence Profile: The contour of a restoration as it transitions from the implant platform or root surface through the soft tissue to the visible crown. Proper emergence profile requires scanning the gingival architecture — ideally with a well-adapted provisional in place.
How to Master Your Intraoral Scanner — Regardless of Brand
Scanner mastery depends on technique rather than equipment — a skilled operator with a mid-range scanner will consistently outperform a mediocre operator with a premium device — yet less than 2% of dentists have truly mastered their intraoral scanner because advanced technique is rarely taught in manufacturer training or dental school.
It's Technique, Not the Tool
Here's a truth that scanner companies don't advertise:
A skilled operator with a mid-range scanner will consistently outperform a mediocre operator with a premium scanner.
The tool matters less than the technique. The scanner matters less than the scanning.
The 2% Who've Mastered It
Less than 2% of dentists have truly mastered their intraoral scanner.
Not because mastery is impossibly difficult, but because:
- Manufacturer training covers basics, not advanced technique
- The nuances aren't taught in dental school
- Expert knowledge is scattered across different practitioners
- Most dentists don't know what they don't know
Signs You're in the 2%
You know you've mastered your scanner when:
- Remakes are rare exceptions, not regular occurrences
- You can predict exactly what the lab will receive
- You understand your scanner's specific strengths and limitations
- You have systematic checks before every case
- Your lab comments on the quality of your scans
How to Evaluate Your Current Level
Be honest with yourself:
- Do you verify bite registration before every case?
- Can you identify mesh crashes before sending?
- Do you know your scanner's accuracy limitations for full arch?
- Have you asked your lab for honest feedback recently?
If you answered "no" to any of these, there's room to grow.
"A skilled operator with a mid-range scanner will consistently outperform a mediocre operator with a premium scanner. The tool matters less than the technique."
The IOS Festival
Everything on this page scratches the surface. The checklist helps you catch problems. But truly mastering your scanner requires going deeper.
That's why we created the IOS Festival—the only course in the world 100% dedicated to intraoral scanning mastery.
What Makes It Different
Scanning Mastery
Whatever intraoral scanner you use, you'll learn brand-agnostic tips and topics you can apply.
Real Practitioners, Real Techniques
No vendor presentations. No sales pitches. Just expert users sharing the advanced techniques that took them years to develop.
Brand-Agnostic Comparison
See how different scanners actually perform side-by-side. Understand real strengths and limitations. Make informed decisions.
Hands-On Learning
Practice advanced techniques with expert guidance. Walk away with skills, not just knowledge.
The Experience
This is Modena: Home of Ferrari, world-class cuisine, and a culture built on the relentless pursuit of excellence — the perfect setting for two days of intraoral scanning mastery. The IOS Festival is far more than a course. It's a complete experience, where exceptional learning sits alongside unforgettable social events and the chance to connect with practitioners who share your standards.
What's included:
- Exclusive tour, cocktail and gala dinner at the Enzo Ferrari Museum
- Evening at the Casa Museo Luciano Pavarotti, with tenor performance and dinner
- F1 Simulator experience
- A sunset cocktail party, and more
- Other once-in-a-lifetime optional activities
- Accommodation and transfers to social events
Course Details
- Dates: April 14–18, 2027 — with the 2-day course taking place on 16-17.
- Location: Modena, Italy
- Investment: US$4,350 (Early Bird price until July 30 2026)
- Companion ticket: US$1,200
Early bird pricing ends 30 July. Tickets are limited in number and in time. Once they sell out or the deadline passes, the price goes up. Book now to lock in the lower rate.
Frequently Asked Questions About Intraoral Scanning
What is the most common intraoral scanning mistake dentists make?
Bite registration errors are the single most common scanning issue dental labs encounter. The problem is that modern scanning software automatically smooths and fills bite data, making everything look correct on screen while hiding occlusal collisions (where meshes penetrate each other) and occlusal gaps (where false separation appears). Verifying the bite in sagittal view before sending catches the majority of these invisible errors.
Why does my scanner show a perfect bite when the lab says it's wrong?
Modern scanning software is designed to present a clean, visually appealing model on your screen. It automatically fills gaps, smooths mesh intersections, and corrects visual anomalies — which is helpful for visualization but misleading for accuracy. The software is essentially guessing at the contact points, and those guesses become problems when the restoration doesn't fit. Using a cross-section or slice tool to inspect the bite in sagittal view reveals the actual mesh relationships your software is hiding.
Can intraoral scanners be used for full arch implant cases?
Intraoral scanners are excellent for capturing soft tissue, emergence profile, opposing arch, and bite registration in full arch cases. However, no current intraoral scanner — regardless of brand or price — can reliably capture full arch implant positions with the accuracy required for passive fit. This is because micro-distortions accumulate as the scanner stitches thousands of small images across the arch. For cases with 4 or more implants, photogrammetry verification is recommended to capture implant positions with laboratory-level accuracy.
What is photogrammetry and when should I use it in dental scanning?
Photogrammetry is a verification method that uses fixed reference points and triangulation to measure implant positions with laboratory-level accuracy. Unlike intraoral scanners, which accumulate stitching errors across long spans, photogrammetry measures absolute positions without compounding distortion. Smartphone-based solutions like PIC Dental have made the technology accessible. DSD recommends photogrammetry verification for any case involving 4 or more implants.
Does the brand of intraoral scanner matter for scan quality?
Technique matters significantly more than equipment brand. A skilled operator with a mid-range scanner will consistently outperform a mediocre operator with a premium scanner. Less than 2% of dentists have truly mastered their intraoral scanner, and the gap between average and excellent results is almost entirely attributable to scanning technique, verification habits, and understanding what the lab needs — not which scanner sits on the counter.
What is a complete patient avatar in digital dentistry?
A complete patient avatar consists of five scan components that labs need for truly predictable restorations: (1) the preparation itself — margins, clearance, and path of insertion; (2) the opposing arch for occlusal design; (3) bite registration showing how upper and lower arches meet; (4) soft tissue capturing gingival architecture around the tooth; and (5) context including smile line, facial midline, and lip dynamics for anterior aesthetics. Most dentists focus only on the preparation, which is necessary but not sufficient for optimal results.
How do I capture soft tissue data for anterior esthetic cases?
The most effective method is to scan the provisional restoration in place before scanning the preparation. The provisional gives the lab three critical pieces of data: the gingival contour the tissue has adapted to, the emergence profile that works in the patient's mouth, and a template for the final restoration. The workflow is straightforward — scan the provisional in place, remove it, scan the preparation, and send both scans with clear labeling. This adds minutes to the workflow but transforms aesthetic results.
How can I tell if my scanning technique needs improvement?
Four honest self-assessment questions reveal where most dentists stand: Do you verify bite registration in sagittal view before every case? Can you identify mesh crashes before sending? Do you know your specific scanner's accuracy limitations for full arch cases? And have you asked your lab for candid feedback on your scan quality recently? Answering "no" to any of these indicates room for improvement. DSD's 15-Point Self-Assessment Checklist provides a systematic framework for evaluating and improving every scan before submission.
Continue Learning

Ready to Eliminate Scan Remakes?
Download the 15-point verification protocol built from analyzing 10,000+ cases — and start sending lab-ready scans with confidence.
Get the Free Checklist →