By Digital Smile Design
⋅ 9 min read
⋅ Updated May, 2025
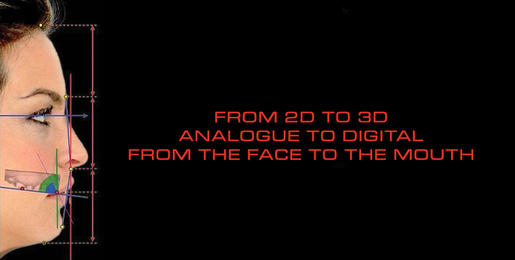
From 2D to 3D, analog to digital, from the face to the mouth. In this article, DSD founder Christian Coachman explores the evolution of smile design from analog sketches to digital 3D renderings – and techniques that enhance patient esthetics.
Want to find out how DSD can help you with your goals? Book a discovery call for advice tailored to your situation.
Drawings are just sketches... whilst they are important to improve visualization and diagnosis of esthetic problems, develop insights about possible solutions and aid interaction with the team and the patient, without the know-how, skills and protocols to transform these drawings into 3D renderings, drawings remain just drawings.
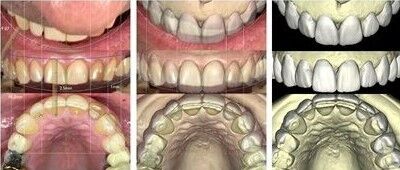
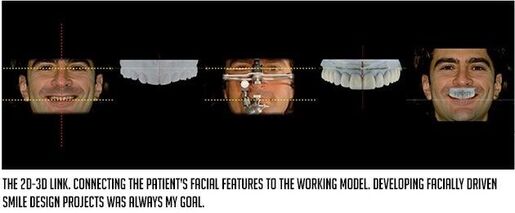
Every time we make these drawings, we need to understand how we will transform them into a tangible reality. For me, drawing over facial photos was always the key to help me link the patient's face to the working model to allow me to develop smiles integrated with lip dynamics and facial features. The main challenge for me as a technician is that although analog devices such as face bows and articulators remain useful tools for establishing functional parameters, they bear no correlation to the delicate facial esthetic integration.
It doesn't matter if the protocol is digital or analog, the most important is to be able to see in 3D. The brain needs to be trained to see beauty and to see in 3D.
As a technician I had 2 main mentors, Juvenal de Souza and Pinhas Adar, in the process of going beyond being a ceramist and becoming a real Smile Designer as well.
Even though I've met and learned from several great ceramists, Juvenal and Pinhas had a different set of skills that caught my attention: the ability to interact with the patient and understand their dreams and desires. They were also experts in facial analysis and creating/customizing harmonious smiles integrated with faces. Juvenal developed an amazing technique on morphological research to discover the best layout for people that had huge dental/bone losses and almost no intraoral references.
Being able to visualize facial references to help technicians develop a facially guided project on the working model. Seeing, planning, and performing it.
As a technician, I was always aware of this challenge. I realized that dentists were spending too much time in the mouth, reshaping and fine tuning the work technicians were doing in the lab. As a dentist/technician, I was able to see both sides of the problem and understand that everything you can do outside the mouth to save time in the mouth, we should do. The dentist's chairside time is definitely a very expensive time and creating work with immediate esthetic integration would help save this precious time.
So many times, when trying in my lab work, I would realize that basic esthetic parameters were missing and intraoral esthetic adjustments were required. My goal was to reduce this gap by creating a more effective protocol to bring the clients face to my lab bench.

For a smile designer, it doesn't matter whether the case is a simple direct composite or a veneer case, a complex full-mouth rehabilitation, a denture case, or even a complex orthodontics or orthognathic case. The process is always the same: initially, we will ignore the intraoral structure and develop the facially guided smile frame that suggests the best ideal position of teeth and gingiva in the upper arch in harmony with the face.
That's why the best exercise is to practice the design of wax rims in edentulous patients. Usually, dentists and technicians with experience in dentures are naturally the best smile designers, because they are used to working with patients that don't have intraoral references and the only thing to follow is the face.
After designing the facially driven smile frame, one can then start the comparison between the smile frame and the actual position of teeth and gingiva. This will generate the facially driven treatment planning process that has the final goal of creating the most simple, minimally invasive treatment, bringing function, biology and structure in account and getting as close as possible to the initial ideal design.
Want to find out how DSD can help you with your goals? Book a discovery call for advice tailored to your situation.
Generations of the 2D-3D smile design process
Like everything else, the smile design process also evolved through the years. Dentists and Technicians were always seeking for better ways of linking the patients face to the working model, allowing the technicians to develop more beautiful designs which required less adjustments in the mouth.
In my personal experience, I was able to evolve through the generations below. It started with simple analog drawings and it moved into 3D digital:
- Generation 1. Analog drawings over photos and no connection to the analog model.
- Generation 2. Digital 2D drawings and visual connection to the analog model.
- Generation 3. Digital 2D drawings and analog connection to the model.
- Generation 4. Digital 2D drawings and digital connection to the 3D model.
- Generation 5. Complete 3D workflow.
- Generation 6. The 4D concept. Adding motion to the smile design process.
Generation 1
Analog drawings over photos and no connection to the analog model. First, I started with hand drawings over printed photos of the patient in the 90's, to express our ideas, working with Dr. Marcelo A. Calamita.

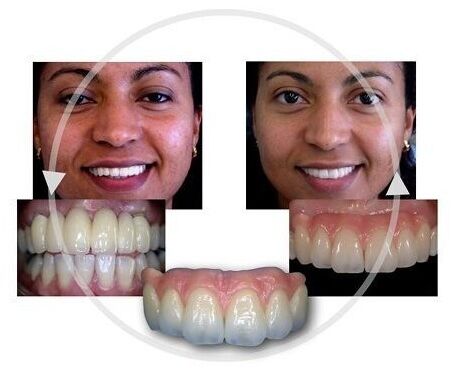
In the late 90's, when anterior implant cases started to come into my lab, I immediately realized the esthetic limitations of this modality. Not being able to rebuild the soft tissue architecture ideally and its impact on the smile design process was huge for me.
At that moment I realized the need to learn not only how to reproduce natural-looking teeth but also how to reproduce natural-looking gingiva with ceramics and composite, to rebuild the pink frame and allow for natural tooth morphology and facial harmony.
My main mentor in this process was CDT Juvenal de Souza, still today one of the main experts in pink prosthetic reconstruction. The process was initially described in his book: Esthetic Dentistry and Dento-Gingival Prosthesis.

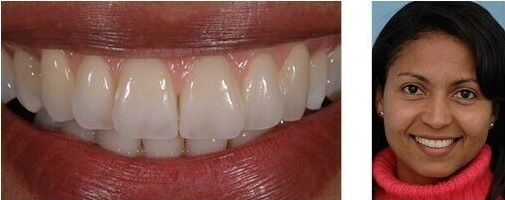
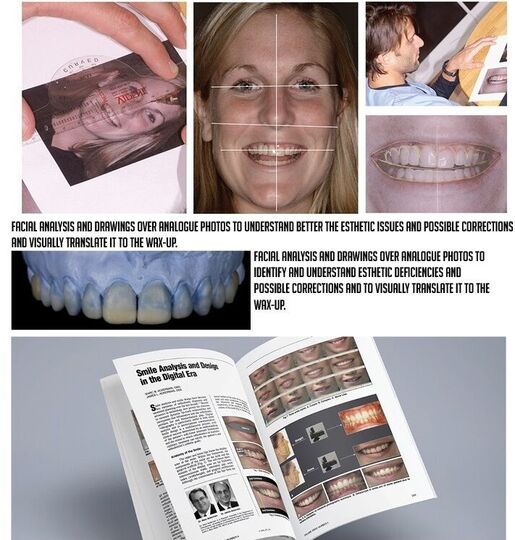
In the 2000's, I started to link handmade drawings over facial pictures to guide my wax-ups by visual comparison. I also learned in Atlanta to use transparent paper over the patient photo to draw over it and communicate.
Facial dynamic analysis
The first publication I am aware of that mentions Digital and Smile Design is the JCO article from the Ackerman's in 2002.
For me, the highlight of this article is the information on smile dynamic analysis through videography, something that we brought to the restorative world with the DSD Concept later on.
Generation 2
Digital 2D drawings and visual connection to the analog model. In 2005, I started drawing using PowerPoint, that was presented to me by Livio Yoshinaga, and inspired by people like Alan Sulikowsk, Frank Spear and Ed McLaren.
Still, the link between drawings and working model was made by visual comparison, usually by using close-up smile photos or only frontal facial photos, so the face was not taken into consideration fully.
The first publication that I saw using digital drawings to improve the smile design and treatment planning process was the article from Dr. Alan Sulikowski and Aki Yoshida.
At that time, some other professionals - including Edward Mclaren - also started to use Photoshop mainly to analyze color and work with anterior esthetic cases. However, facially driven smile design remained elusive. Similarly, no attempt had yet been made to link the drawings to the physical working model.
PowerPoint and Keynote: generic softwares that can be used for facial analysis and smile design. The advantages are that almost all computers already come with them and they have simple user interfaces and learning curves. For that reason, they are still the most used applications for smile design around the world and are still taught in DSD courses.

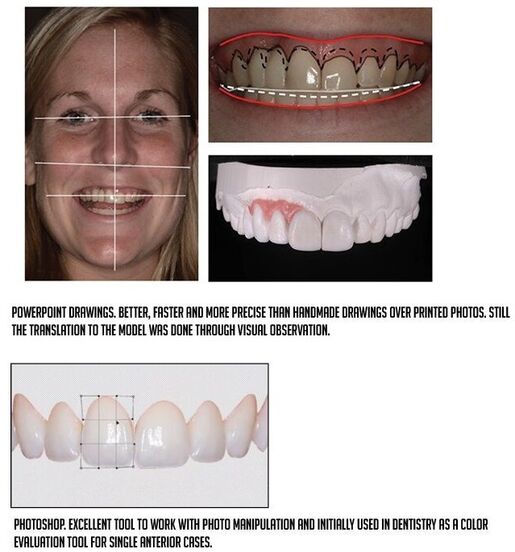
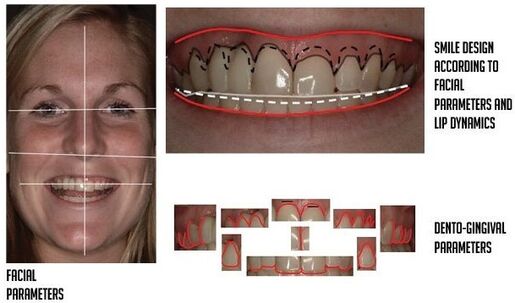
3 steps of facially driven smile design
The Visual Fragmentation concept
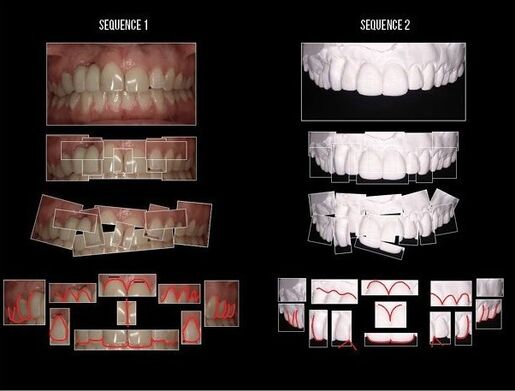
Some people were better than others at seeing what was right and what was wrong. Some people could identify more easily what needed to be changed to improve a design.
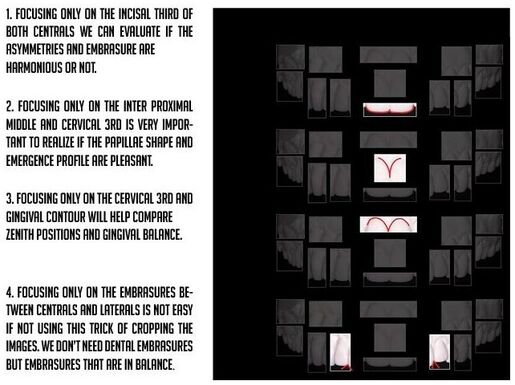
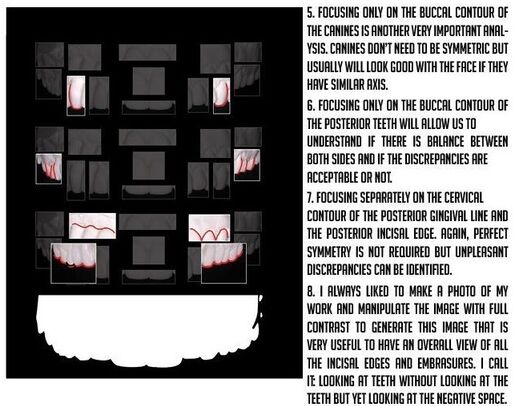
When it came to identifying the details, fine-tuning the shapes and creating harmony, I realized that people were doing what I call visual fragmentation. The brain was able to break the big picture into smaller pieces and then compare individually both sides, simplifying the process so the brain could identify the issues and see the required changes.
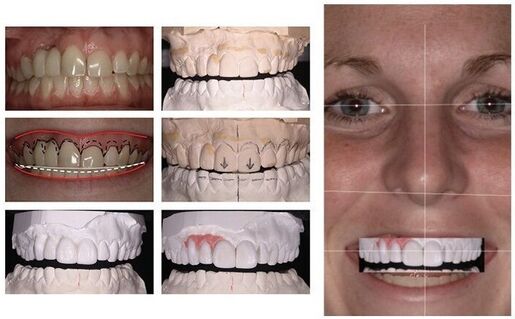
To help people to activate this intellectual process I started to exercise the visual fragmentation by digitally cropping the picture into pieces and symmetrically separating them and then going over the comparative process of both symmetric parts individually, helping our eyes to create the comparative process, which is so important for smile design. I usually did this on the pre-op pictures to identify the initial issues (photo sequence below) and then also did the same with the pictures of my own work: either a wax-up, provisional or a ceramic restoration.
When we eliminate other visual interferences, we focus on the specific details that help our eyes to see what can be improved.
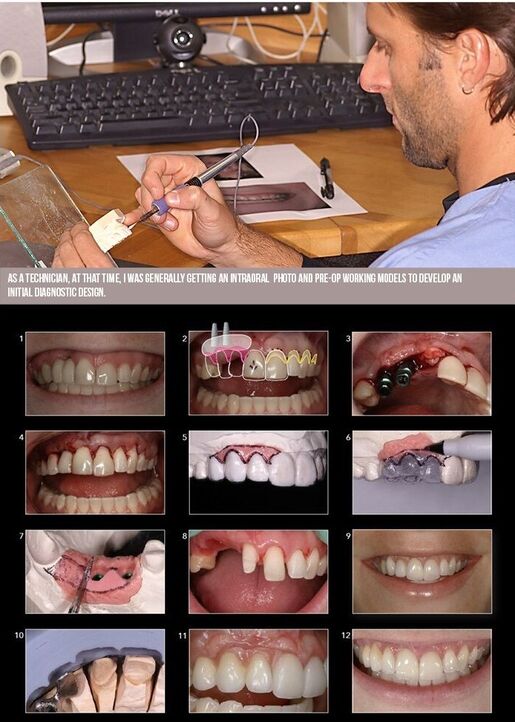
- Pre-op.
- The Plan: Crown lengthening #21-24. Tooth supported restorations #11-21. Implants #13-14. Cantilever #12. Bone and soft tissue graft around implants. Pink implant bridge #12-14. Gingivoplasty and reshaping #15.
- Grafting and implants.
- Crown lengthening.
- Vacuum tray guide over wax-up to guide soft tissue reshaping and restorations.
- Marking the pink interface.
- Reshaping the model soft tissue to generate the ideal prosthetic soft tissue conditioning.
- Tooth preparation.
- Pink provisionals.
- Working model with the silicone guide to guide the framework design and final restorations.
- Final seating of crown and veneer on central incisors and the 3 unit pink implant bridge.
- 3-year follow up.
Prosthetics: Dr David Garber
Implants/Perio: Dr Maurice Salama
Smile Design and Ceramics: Dr Christian Coachman
Generation 3
Digital 2D drawings and connection to the analog model. At that time, dedicated drawing software for dentistry (GPS) was developed to improve the dento-facial integration by Alain Methot. This is the first software package that I had seen that included the face and started to integrate the drawings and the working model. Still, the link between 2D digital and 3D analog working model was flawed and cumbersome but it was for sure the beginning of the digital-analog connection.
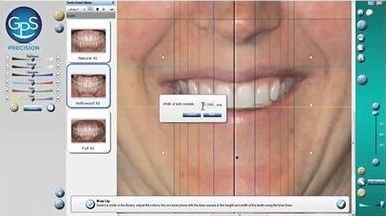
The GPS system. One of the first to link 2D digital smile design and 3D wax-up.
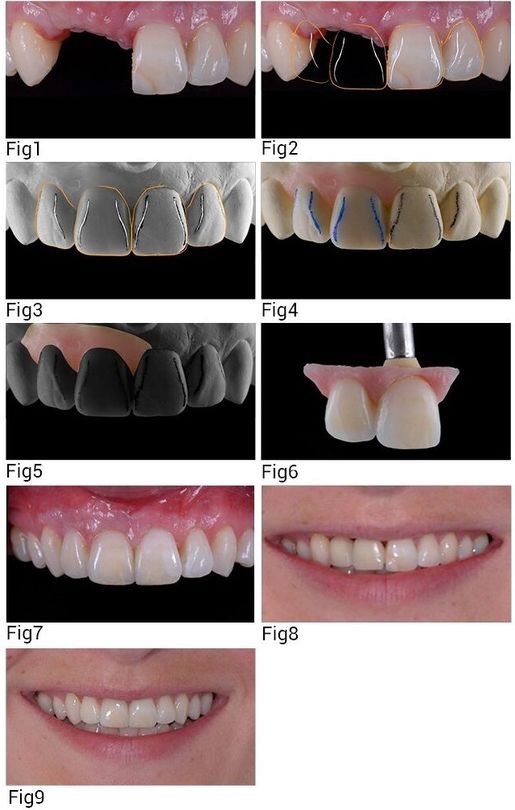
Fig 1. Pre-op situation.
Fig 2. 2D smile design on Keynote for Mac.
Fig 3. 2D quality control over the photo of the analogue wax-up.
Fig 4. Final wax-up (by Christian Coachman).
Fig 5. Evaluation of the 3D ridge defect. Since the patient already went through multiple grafting procedures and esthetically the defect was not completely fixed, the decision was to proceed with a pink hybrid implant bridge (perio/prostho procedures by Dr. Eric Van Dooren).
Fig 6. Final outcome of the pink bridge (White ceramics by CDT Murilo Calgaro, Direct Pink Composite by Christian Coachman).
Fig 7. Final intraoral outcome. A direct white composite class 3 was also performed on #21 by Dr Claudio Pinho.
Fig 8. Before smile.
Fig 9. After smile.
In 2008, I moved from PowerPoint to Keynote, as suggested by Galip Gurel. It was at this time that I developed the first DSD protocol fully facially guided with the 4 views and drawings (frontal, 12 0'clock, occlusal and profile). A simple protocol that enabled us to understand the face in a tridimensional way, even though we were working with 2D photos. The new addition was the 12 o'clock photo that became key for smile-face integration.
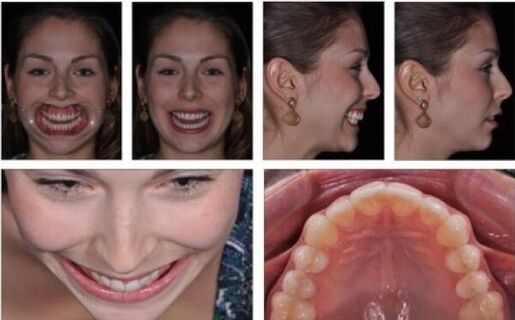
The images above show the DSD photo protocol with 6 photos in 4 views. Highlight to the new 12 o'clock view that brings important information to the technician to integrate the smile in 3D with the face.
In 2009, I also started to link the drawings to the working model with specific marks and overlapping pictures. Not ideal yet, but useful.
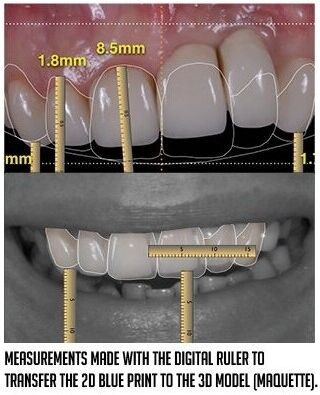
Also in 2009, I created the digital ruler. This is probably the most useful tool I have ever invented. This ruler was intentionally shared online by me and all DSD instructors and it really helped technicians and dentists from all over the world improve the link between their 2D drawings (irrespective of the software used) and the analog model to facially guide wax-ups and set-ups as it introduced a calibration method for quantitative transfer of dimensions.
This proved very useful for team communication and brain-storming our treatment plans.
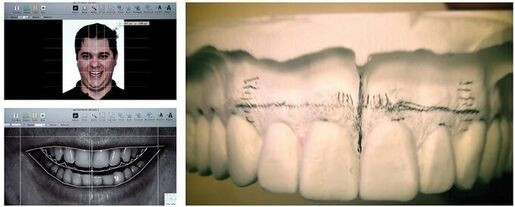
(see image above) Our first strategy to link the drawings to the working model and initial wax-up, before we developed the digital ruler, was through marks made on the model that allowed us to transfer the horizontal plane and vertical midline from the 2D computer screen to our 3D analog wax-up project.

Above, the worldwide-known and used 'DSD Digital Ruler'
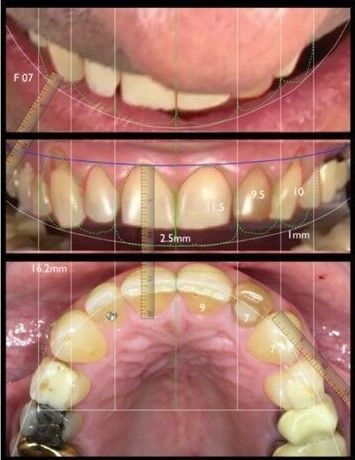
Above we can see 3 basic frontal views of DSD with the smile frame.
The ruler will be used to measure the discrepancies in all views between the actual position of the teeth and gingiva and the proposed position. Because of its simplicity and efficiency, this is an important step to improve the link between the 2D drawings and the guided wax-up and for treatment planning and team communication.
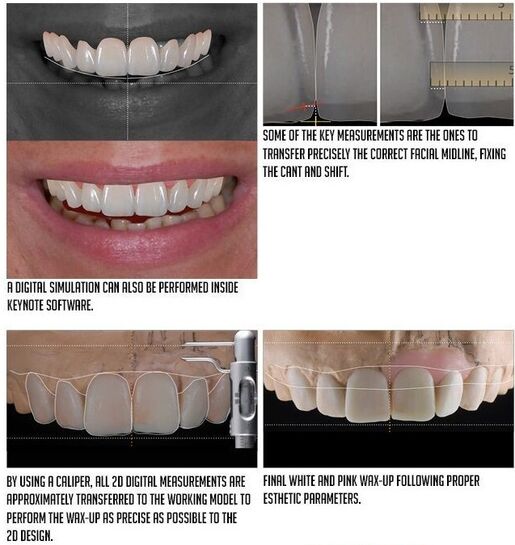
The ruler seamlessly integrated the 2D project and the 3D facially guided wax-up.
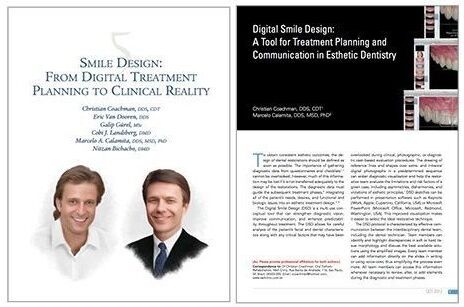
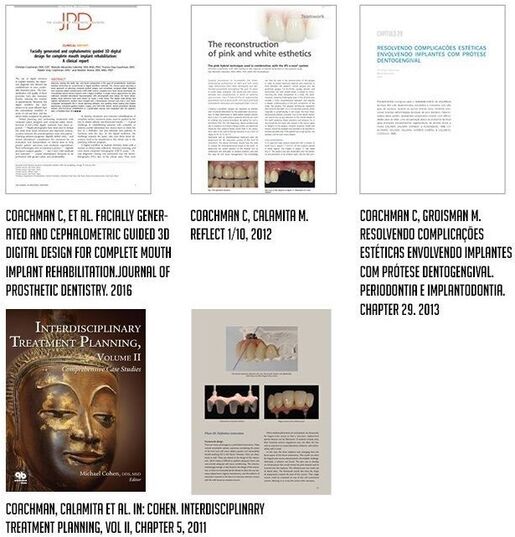
These were the two first articles from our team talking about Digital Smile Design:
- Coachman, Calamita et al. Smile Design: From Digital Treatment Planning to Clinical Reality. Interdisciplinary Treatment Planning, Volume II, 2011.
- Coachman, Calamita. Digital Smile Design: A Tool for Treatment Planning and Communication in Esthetic Dentistry. QDT 2012.
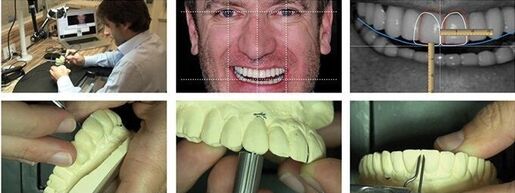
The technician should always work with the computer screen in front of them. The combination of digital ruler and caliper generates a very reliable workflow to translate the 2D facially guided findings to the 3D analog wax-up.

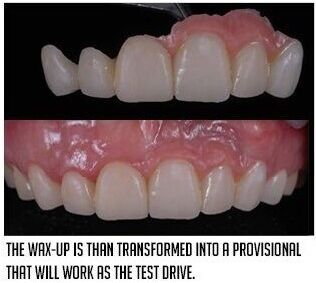
The mock-up performed based on the facially guided wax-up demonstrates pleasing facial integration without any need for intraoral adjustments due to the efficient 2D-3D link.
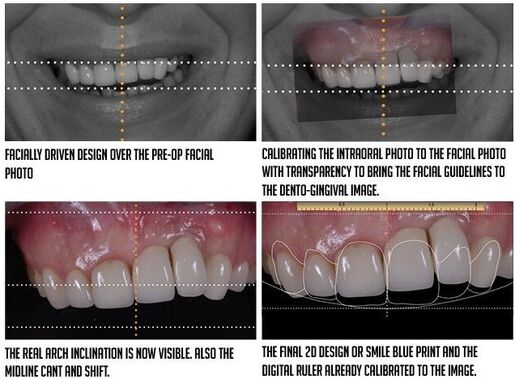
The 'blueprint'
A blueprint is a type of paper-based reproduction, usually of a technical drawing (2D), documenting an architecture or an engineering design. More generally, the term 'blueprint' has come to be used to refer to any detailed plan.
The 'maquette'
A maquette (French word for scale model) is a small scale model or rough draft of an unfinished architectural work or a sculpture.
An equivalent term is bozzetto, from the Italian word that 'sketch'. It is used to mean visualize and test shapes and ideas without incurring the cost and effort of producing a full scale product.
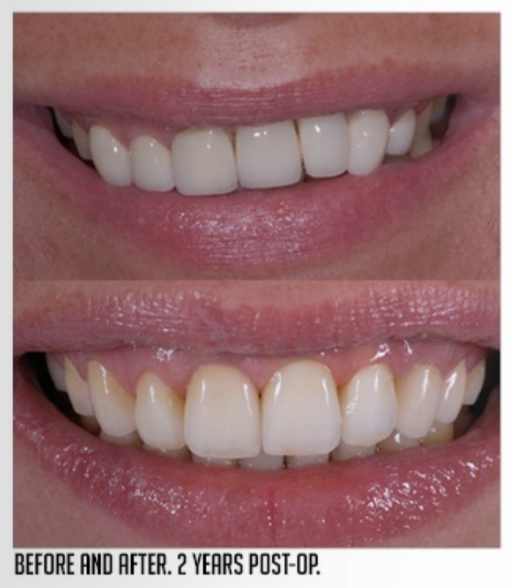
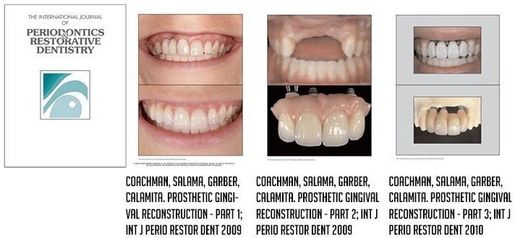
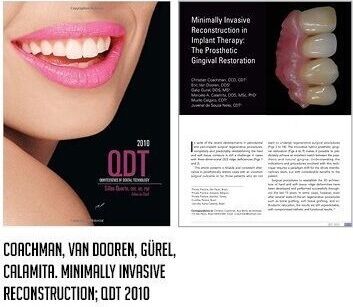
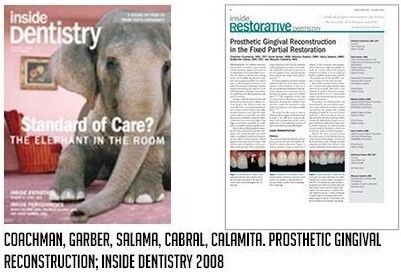
The Pink Revolution publications from Coachman and team

The decision to undergo transformative esthetic procedures is a highly emotional undertaking for our patients. At once there are feelings of shame to overcome, apprehension about the appearance of the outcome and hopes that confidence will be restored.
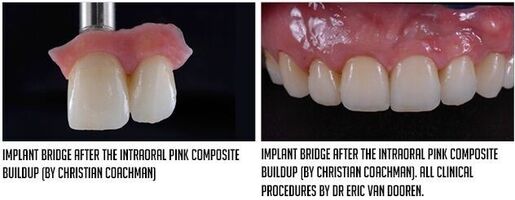
Transferring the mock-up directly to the patient's mouth to create a sense of excitement and instil confidence in the clinician's abilities creates a crucial emotional link between the patient and the treatment proposal. And this is a critical precursor to presenting the clinical treatment plan and financial estimate. A precise wax-up is the key to maximizing the emotional impact and subsequent case acceptance. This necessity highlighted the importance of the 2D-3D link to guide a facially generated mock-up.
Also during this year, in collaboration with Livio Yoshinaga and Galip Gurel, we developed a protocol of Dynamic Facial Analysis using simple videos. Inspired by the words of Mauro Fradeani: 'the beauty of a smile comes from its motion', it didn't make sense to analyze smiles with static photos if the ideal integration needed to be seen in motion.
I drastically changed my perception of facial integration and from that point forward, all facial drawings were calibrated according to the dynamic analysis. Facial Dynamic Analysis for smile design. The video will improve the decision making process when developing a facially integrated smile project.
Simultaneously during this very productive period, we met Dr. Braulio Paolucci who introduced the Visagism concept to dentistry, taking Dental Morpho-Psychology to the next level.
In collaboration with Braulio, we developed a simple protocol to use Visagism in daily basis. The idea of this concept was to find a shortcut to the client's dream smile that would better express oneself.
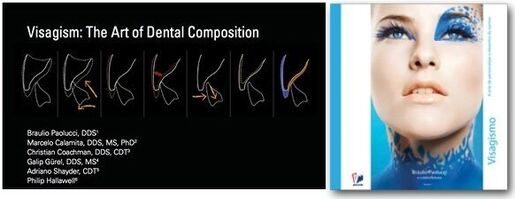
2 publications from our team about morpho-psychology and dental visagism. The QDT article and the book from Dr. Braulio Paolucci with our DSD chapter. Both in 2012
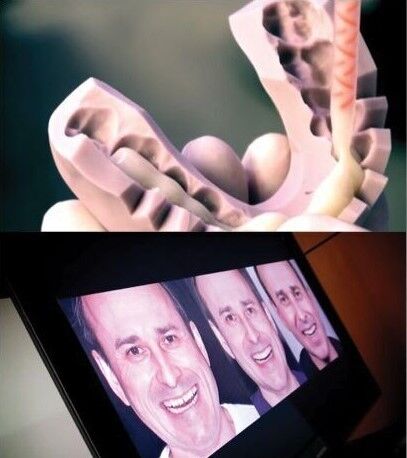
In 2009, the concept of Emotional Dentistry and the Motivational Mock up was developed.
This not only involved the 2D-3D link and the guided wax-up for technical purposes (technical mock-up), but incorporated and added dimension to increase case acceptance through a series of strategies that used the Motivational Mock up as the main protagonist, allowing for a real-time visualization of the projected esthetic rehabilitation.
Generation 4
Digital 2D drawings and connection to the 3D digital model. During this period, Livio and I had several meetings with CAD/CAM companies trying to present our 2D-3D fully digital workflow vision and our ideas on how to link them to facilitate the process and allow more professionals to get into the digital world in a simple way.
We believed that 2D was still the best entrance to the 3D digital world since it was easy and inexpensive for all dentists. We also believed that the existing distortion when linking 2D to 3D, digital or analog was irrelevant and would not harm the final facial integration of the smile. This proved to be correct after several years digitally designing smiles and proving that this distortion is minimal and doesn't affect the quality of the work.
Companies didn't really pay attention to us at that time and remained focused on the complicated 3D digital world. Unsurprisingly, dental software companies eventually found that their endeavours were not as lucrative as they had hoped.
The protocol was to allow dentists to guide the whole process with the 2D project and outsource the 3D work to software experts, the modern technician. The link between 2D digital to 3D digital was the goal. Starting with 2D because it was simple, fast and didn't require any investment in technology.
Since we had no positive response from these companies, in 2012 we started our first in-house digital project to link 2D to 3D in partnership with Romanian dentist, Marius Hack; the DSD Connect concept and its software were born. A simple way to connect 2D images with drawings created on any 2D app overlaid on any 3D software system.
This concept was successfully used over CAD/CAM and orthodontic software, linking for the first time the drawings to digital restorations and 3D digital orthodontic planning.
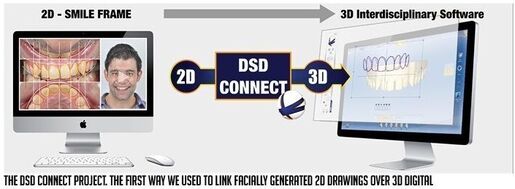
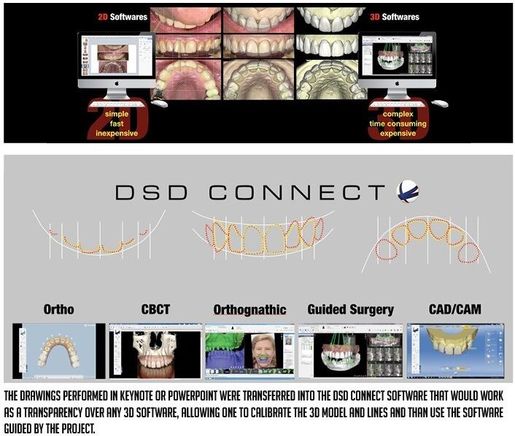
In 2013, a definitive change was developed when the partnership between DSD and Nemotec was initiated and for the first time, the 2D-3D connection made the transition to a completely digital format, which for me remains the ideal protocol to this day.
The facial photos with drawings are easily calibrated within the software, allowing the 3D designer to develop the project guided by the parameters predetermined by the dentist. With the DSD and Nemotec collaboration, the NemoDSD 2D/3D software was developed. The first completely facially driven smile design software with the 2D-3D link.
All facial photos in the 4 DSD angles can be calibrated to the STL 3D file of the model and the 3D digital wax-up can be performed with extreme precision and ideal facial integration. From here, all mock-ups, provisionals and restorations became much more predictable from the facial integration stand point, and intraoral esthetic adjustments were significantly reduced.
The 2D project can be performed with several different 2D generic apps, including Keynote, PowerPoint and Photoshop, as well as specific dental apps such as smile designer pro, and many others. Some of these are linking their project to 3D replicating similar concepts to our original DSD Connect concept.
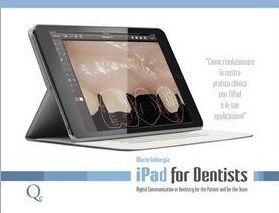
Above, the book from Mario Imburgia (Quintessence, 2014), showing the use of iPad for smile design and patient communication.
It's an honor for us to see that now, most of the prominent CAD/CAM systems have reconsidered our 2D-3D idea and are now copying it.

Currently, several apps and software can be used to develop the 2D project. The first photo above shows a generic iPad app (iDraw) being used for smile design. In the second photo, we have the specific dental app, Smile Designer Pro and in the third photo we have Photoshop being used as a smile design app. All of them directly or indirectly can be linked to 3D software since most of these companies have adopted the initial DSD idea of 2D-3D link.
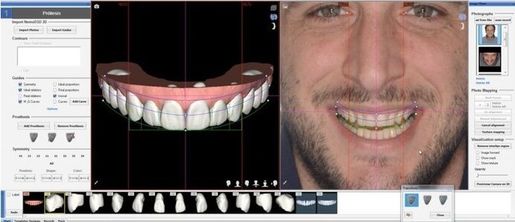
With the DSD and Nemotec Corporation, the NemoDSD 2D/3D software was developed; the first completely facially driven smile design software with the 2D-3D link.
All facial photos in the 4 DSD angles can be calibrated to the STL 3D file of the model and the 3D digital wax-up can be performed with extreme precision and ideal facial integration. From here, all mock ups, provisionals and restorations became much more predictable from the facial integration stand point, and intraoral esthetic adjustments were significantly reduced.
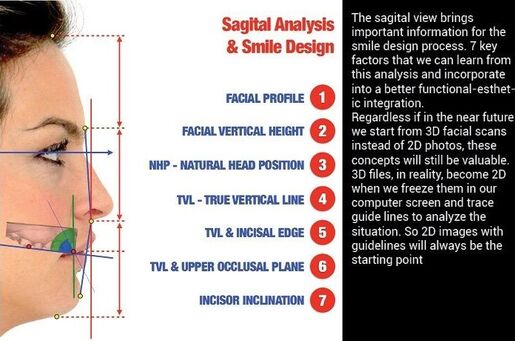
The journey for better facial analysis continued and, in 2014, I also started to incorporate sagital facial analysis into my smile design projects.
As a technician and restorative dentist, I realized we were exploring this view very little in our design process. As we were treating many interdisciplinary cases in collaboration with Orthodontists and Orthognathic surgeons it was a natural learning process for me.
Planning a veneer case, a denture case or a Maxillary Orthognathic case, for us, became the same process: Understanding in 3D the ideal esthetic position of upper anterior teeth, integrated with face and lip dynamics, and from there, treatment plan the case, bringing together all functional, biological and structural principles. The decision-making process, in a smile design project, starts with the 2D analysis, integrating the frontal and sagital views, and the final verdict always comes from the dynamic facial analysis with the video images.
So the modern Smile Designer will integrate the beautiful principles learned from entire experts, plus the principles from sagital analysis learned from orthodontists and orthognathic specialists and will fine-tune all decisions by analyzing the face and lip dynamics from the video. That's what we do in every case.
Facially drive smile design project for interdisciplinary treatment planning
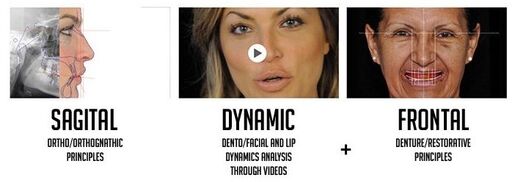
The complete facial analysis protocol for total harmony in prosthetics
The SKYN concept and natural algorithms. Making smiles even more natural.
In 2013, we upped the ante. We learnt from master Paulo Kano the Natural Algorithms concept, known today as SKYN Concept. At that time this was still a combined analog and digital protocol.
Paulo proved to us that scanners were able to scan natural morphology, software could properly manipulate this information and most of all, milling machines were able to mill this same beautiful natural algorithm.
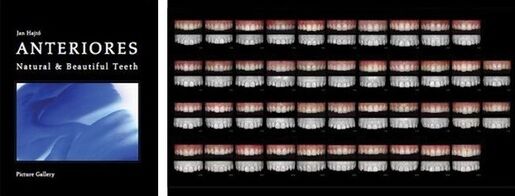
The book "anteriors" from Jan Hajto, that inspired Paulo Kano to use natural algorithms in anterior restorations. A set of models of natural dentition would come with the book.
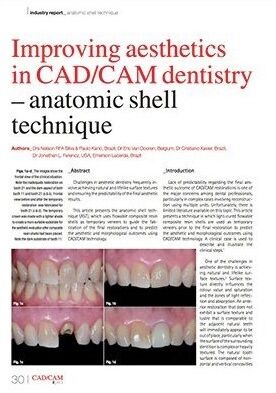
First publication from Paulo Kano about the anatomic shell technique that now is known as 'Skyn Concept'.
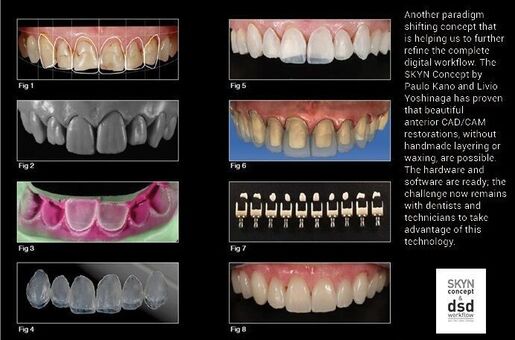
The SKYN Technique
Fig 1. A smile analysis is performed to understand which modifications are needed.
Fig 2. Analog models of beautiful natural dentition are used. Initially the models used were from Dr. Jan Hajto's kit.
Fig 3. A silicone buccal index was made and super thin composite shells were fabricated to copy the natural algorithms of the buccal surface.
Fig 4. The composite "SKYNS" ready to be placed in the mouth.
Fig 5. Composite "SKYNS" in the mouth usually after a pre-preparation to allow for ideal buccal/palatal positioning.
Fig 6. The skins were intraorally scanned. Then, tooth preparation through the "SKYNS" was performed, and the preps were also scanned intraorally.
Fig 7. The monolithic restorations were milled with multi colored blocks.
Fig 8. After stain and glazed, the natural algorithms restorations were cemented.
The SKYN Concept and the DSD Concept had a perfect match: Facially driven design and interdisciplinary plan from DSD and natural-looking beautiful CAD/CAM restorations from the SKYN Concept.
I immediately took this amazing paradigm-shifting idea into the digital world and together with Nemotec, we developed the first natural algorithms library for our 3D software. Now, not only was the facial 2D-3D link perfected, but it integrated beautiful, natural tooth morphology.
Our digital wax-ups started to generate mock-ups and restorations truly replicating detailed natural morphology, requiring little to no esthetic adjustment.
The world of facially driven, completely digitally designed smiles with natural algorithms was starting! Now the challenge was to translate this into CAD/CAM monolithic restorations.
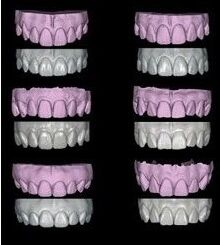

In 2014 we scanned the models from Jan Hajto's book and added to the digital library of the NemoDSD 3D software.
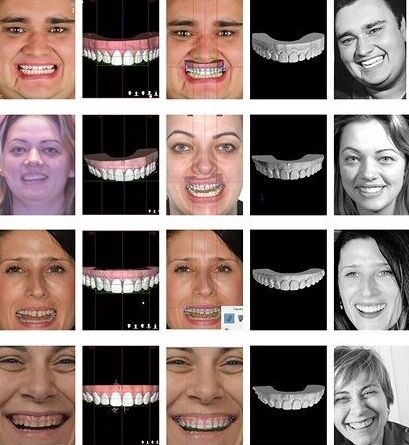
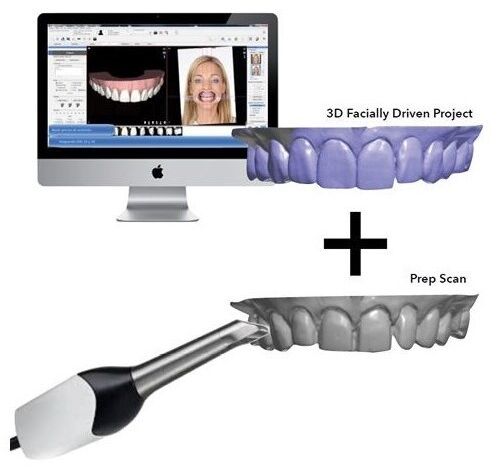
The idea of fully digital ceramic CAD/CAM restorations, facially guided and with natural algorithms was the next step.
This first happened in 2015 when we exported the facially driven 3D design with natural algorithms from NemoDSD to Exocad and fabricated the first restorations with this concept, what we can call the first fully 'digital SKYN" restoration'. After that we, and others, started to bring this information to different systems.
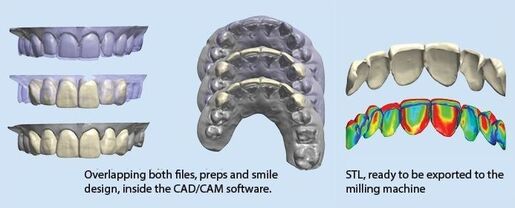
First case done (Feb 2015) with a complete digital workflow (NemoDSD + ExoCAD), combining the facially driven smile frame concept from DSD and the monolithic natural algorithms idea from SKYN.
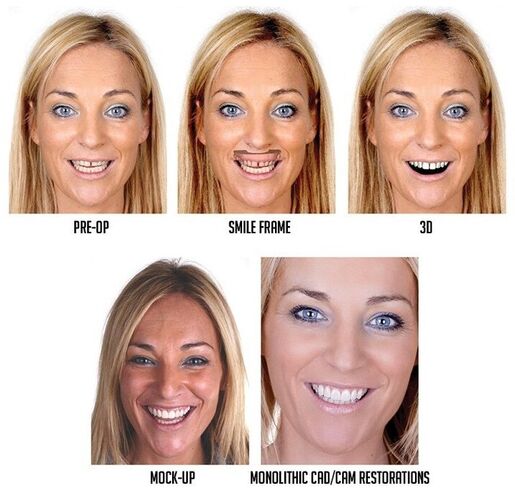
The first cases with this technology and complete digital workflow were performed by the DSD Lab in Madrid and the Avila Mafias Lab, also in Madrid.
What are your goals right now?
Book a discovery call for tailored advice specific to your unique challenges, goals and opportunities and learn how Digital Smile Design can help you on your journey.

