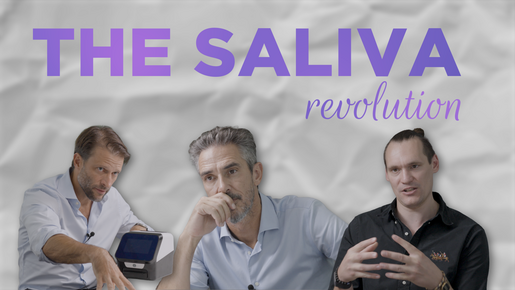
By Dr Elisa Praderi
⋅ 6 min read
⋅ Updated Apr, 2025
This guest post was written for DSD by Dr Elisa Praderi, Senior Clinical Protocols and Key Opinion Leader Manager at Formlabs Dental.
The DSD Clinical course was a proof of concept for Formlabs 3D printed dental solutions which allowed us to check that what is promised, is delivered. One patient’s gut reaction? "I’m taking this with me”.
In recent years, 3D printing has emerged as an indispensable tool in dentistry which revolutionizes how clinicians approach treatment planning and execution. This technology bridges the gap between meticulous digital planning and physical reality, enabling the creation of precise printed parts that help us deliver optimal patient care. By integrating 3D printing into clinical workflows, dental professionals can achieve greater accuracy, efficiency and consistency in their treatments.
In this article I will explain what happened when we put the wide range of Formlabs’ 3D Printing tools to heavy test for three days during the DSD Clinical course in Seville – and some important learnings that came out of this experience.
Why 3D printing in DSD workflows?
I am currently the Senior Clinical Protocols and Key Opinion Leader Manager at Formlabs Dental. As a trained dentist, I joined Formlabs wanting to learn more about digital dentistry and specifically 3D printing and new materials, because I believe that there's a lot of innovation power in this area. What problems can the traditional industry not solve with the current materials, and where is there room for innovation?
Personally, I’ve always found it very interesting how DSD started to use Formlabs hardware and resins in their cases. We have collaborated for many years, during which time we have learned from the DSD protocols, workflows and philosophy, and seen how 3D printing has become an instrumental part of it.
For me, the DSD Clinical course demonstrates how this sophisticated engineering of a workflow actually works. Being there as a 3D printing expert, I was able to see in a short time frame not only the implementation of each clinical case but the performance of the 3D-printed appliances in both very complex cases and simple cases. This is all fully guided and when you design an appliance, you can connect appliance A to B to C to D; all those appliances can be powered by 3D printing or used in combination with other techniques. It really shows how to put all the pieces of the puzzle together.
Being part of that process means I can act as a guide. We can test things and demonstrate it: we have the printer there and everything is done live.
My main takeaways from the DSD Clinical course
Digital production for same-day and chairside applications is possible with the Form 4B – of course when planned accordingly and timed appropriately.
The printed indexes for the DSD Direct Technique delivered an amazing output. Printing at 50 microns is the trick. The parts being printed with IBT Flex Resin at this layer height and tested by DSD in a full-mouth rehabilitation does prove that the materials’ adaptation and surface quality achieved are superior compared to traditional clear PVS produced indexes.
The design of the indexes is fundamental, but once mastered, this becomes a crucial and reliable tool for any clinician. DSD became a key partner when developing and testing this application and we put together this application guide and webinar for users to learn how to apply this technique in their clinics.The patient has spoken: when trying two occlusal splints printed with different materials (one rigid and one resilient), both fitted perfectly according to the design with the planned occlusal contacts. But the immediate reaction of the patient when trying the resilient occlusal splint was: ‘I am taking this splint with me’.
Choosing the right tools for precision and efficiency
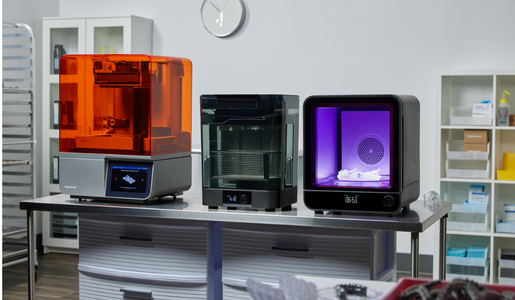
To meet the demands of a fast-paced clinical environment, a reliable 3D printing ecosystem is essential. For the DSD Clinical Course, we used the Form 4B printer, a new printer developed not only to target faster production but also to keep the precision that Formlabs is known for. This printer, paired with advanced post-processing tools for washing and curing efficiently, ensured the production of high-performance parts. Additionally, Formlabs' diverse range of biocompatible and non-biocompatible materials enabled us to cater to various clinical needs, from surgical guides to restorative models.
It was also rewarding for me to work with the other digital partners at the course. 3D printing is a versatile solution that can be combined with other digital solutions, according to the individual needs and indications of the specific patient case.
What we accomplished during the DSD Clinical course
Over the course of three days, we successfully produced a variety of parts which were tailored to specific treatment requirements. Here's an overview of the cases and the materials used:
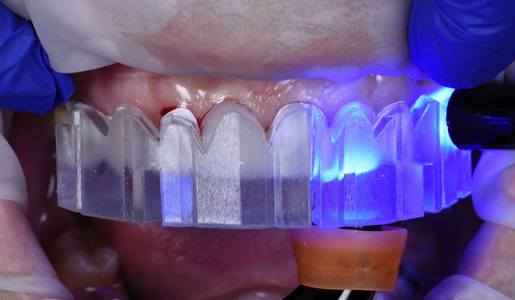
1. DSD Direct Case
Phase I: Direct Composite Restoration Guides to do a full mouth rehabilitation via the pressed composite technique.
You could also use this same material to print a tray to do the full arch mock-up in the patient's mouth with bis-acryl resin.
Material used:
IBT Flex Resin
Resolution (layer height):
50 microns
Important tips for a successful print and appliance use:
1. Ensure a proper design and adaptation: DSD has been testing this material and optimized the design of the trays for efficiency and to make it even easier to use.
2. Post-processing is critical: Instructions need to be followed very thoroughly as stated by the manufacturer in their Instructions for Use.
a. Wash: The wash is the critical part to guarantee an index that will fit perfectly intraorally. Check that the intaglio surface of the appliance is completely clean after washing. You can also use a squeeze bottle with fresh IPA and a brush to clean these critical areas. Use compressed air to dry this part. Not doing so might lead to having some uncured resin in the intaglio surface and this will jeopardize the clinical fit.
b. Curing: The parts printed with this resin require being cured while submerged in water, only this will confirm that the polymerization of the part is optimal for its clinical use.
c. Separating agent: Though we have tested a range of composites with the printed trays and state that a ‘separating agent might not be needed’, it’s important that clinicians try their composite with the printed tray extraorally to confirm that there is no undesired bonding between the material and their composite.
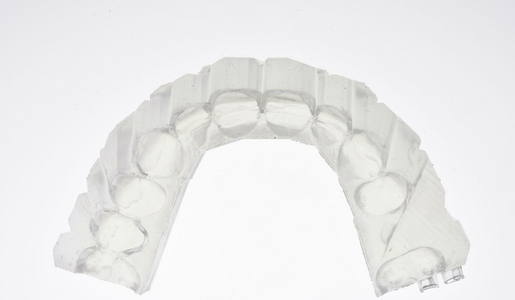
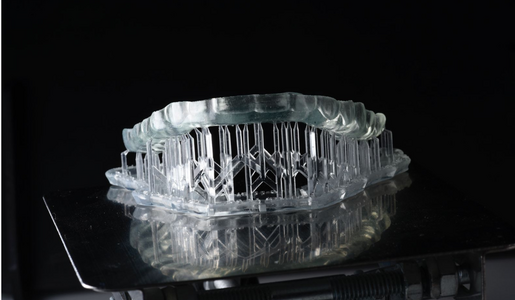
A printed full arch tray.
Photopolymerization is possible using trays printed with IBT Flex Resin.
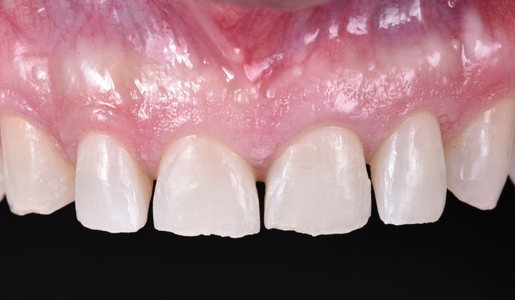
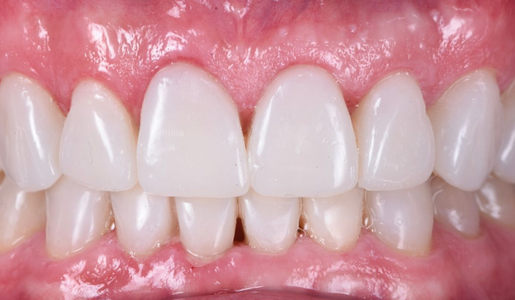
Initial clinical situation (above) and final result (below) of the DSD Direct Technique using the indexes printed with IBT Flex Resin.
Phase II: Hard and Resilient Occlusal Splints produced to protect the new occlusion
Materials used:
In this case, we decided to run a double blind test and print the same splint in two different materials to learn what the dentist and patient reactions are.
1. Dental LT Comfort Resin (flexible/resilient occlusal splint)
2. Dental LT Clear V2 Resin (rigid occlusal splint)
Resolution (layer height):
100 microns
Important tips for a successful print and appliance use:
1. Print orientation: as part of manufacturing guides, the print orientation recommended is different for each resin. For the rigid splint printed with Dental LT Clear V2 Resin, printing the part with the occlusal surface parallel to the build platform is what will guarantee optimal fit. For the resilient occlusal splint printed with Dental LT Comfort Resin, printing the occlusal splint with a 30-60º angulation is what is recommended.
2. Post-processing: As stated above, following wash and curing instructions as stated by the manufacturer is fundamental and where the key to success is.
a. Wash: It’s important that for biocompatible appliances, you are using a dedicated Form Wash (2nd Gen) unit. Both materials have different wash times which you can see here.
b. Cure: Cure parts with supports on.
Learnings:
We printed two occlusal splints, one in a rigid material (which we can compare to a traditional rigid occlusal splint) and a flexible/resilient occlusal splint which becomes more flexible in intraoral conditions. These materials differ in their mechanical properties (the rigid one has a 12% elongation, while the flexible one has an elongation value of 33%). While we might think that the flexible/resilient occlusal splint might trigger clenching and muscle activation, these materials actually don’t differ in their surface hardness (78D for the rigid occlusal splint vs 75D for the flexible one) so we expect that both splints will provide a stable occlusion.
We did have a deep-dive discussion with Christian Coachman during the DSD Masterclass on occlusal splints and we compared the new resilient occlusal splint material to other options out there and to gold standards.
Patient perception:
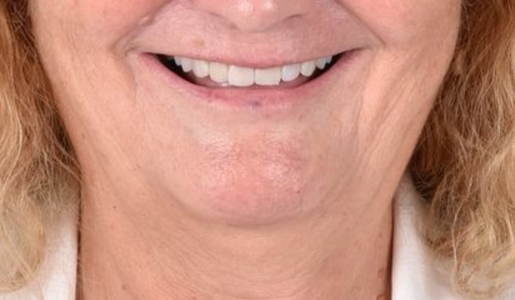
Installation of both splints was spot on. The design accuracy was reflected in the printed part and we were able to confirm this when checking the occlusal contacts and basically no adjustments were needed. We started by placing the rigid occlusal splint in the patient's mouth and checked occlusion. When we later placed the resilient occlusal splint intraorally, the patient automatically said: ‘Wow, this feels more comfortable - I am taking this splint with me’.
Dental LT Comfort Resin was developed as a solution to bridge what a next generation splint material needs to fulfill. On one hand it needs to provide comfort to the patient in order to facilitate patient compliance with the treatment but also provide a stable occlusion. Traditional materials were failing to fill that gap, leaving room for new digital material innovations.
Being able to witness this process and patient perception confirms that the splint is fulfilling the first requirement, which is to provide comfort. Over the next months we will be able to evaluate wear and overall performance over time.
Printed occlusal splint with Dental LT Comfort Resin.
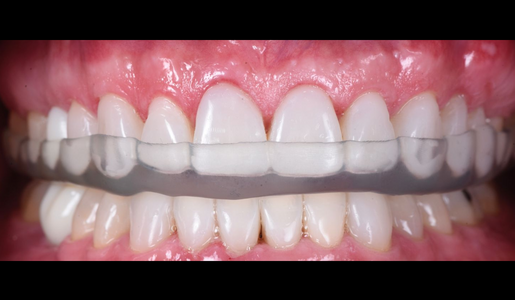
Installation of the occlusal splint.
2. DSD Clic Guide for Full Arch Guided Surgery
Material:
Surgical Guide Resin
Resolution:
50 microns
Enabled precise surgical implant placement with the different set of stackable surgical guides for both upper and lower jaw implant placement. The case was finalized with a temporary full arch implant supported appliance.
Important tips for a successful print and appliance use:
For this protocol where we have stackable parts required to fit on top of each other, printing at 50 microns is fundamental. The DSD Clic Guide involves a ball-socket feature where the different guides connect. Printing at 50 microns enables us to obtain a part with the right precision and accuracy to guarantee an accurate transfer of the digital planning to the clinical scenario.
Respect the dry time: after washing, and prior to final curing, it’s fundamental to let parts dry for at least 30 minutes as stated in the Instructions for Use. This will guarantee that the part is completely dry and free from IPA and ready to cure. Failing to follow this point might lead to problems with the appliance which only become visible after autoclaving.
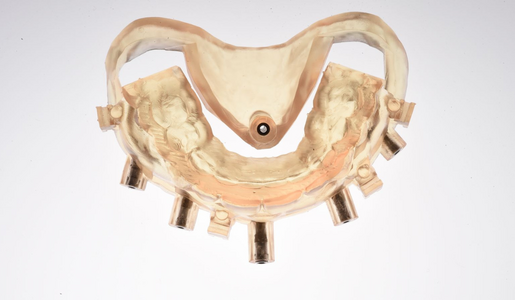
Base Guide fitted with the Position Guide both printed with Surgical Guide Resin.
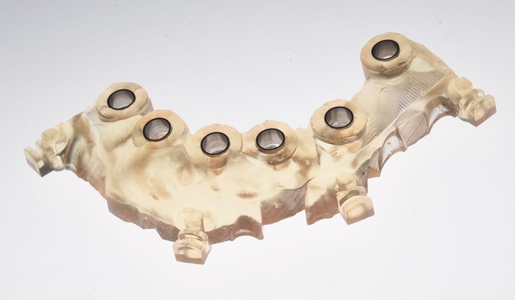
Implant Guide that will be fitted to the Base Guide. Printed in Surgical Guide Resin.
3. Temporary Full Arch Implant-Supported Appliance
Material:
Premium Teeth Resin
Resolution:
50 microns
Learnings:
Connected to the DSD Clic Guide, the temporary appliance was designed to fit the base guide for accurate fit intraorally. The appliance printed with this material enables customization with pink composite and can also last up to 12 months in the mouth.
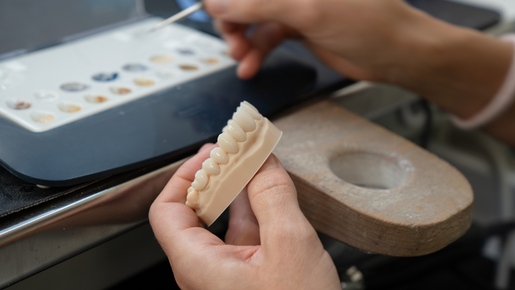
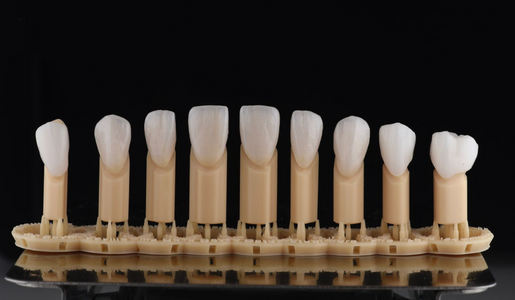
4. Restorative Model with Removable Dies
Material:
Precision Model Resin
Resolution:
50 microns
Important tips for a successful print and appliance use:
Allowed for highly detailed diagnostic and restorative planning. In the full smile rehabilitation, restorations were milled and fitted upon a printed restorative model. We also printed external dies so the lab technician could finish these in the die and check the fit in the master model.
Formlabs has several materials for model production but when it comes to selecting a highly accurate material for restorative or implant model production, Precision Model Resin is the right choice.
Vestibular view of milled restorations fitted on 3D printed dies using Precision Model Resin at 50 microns.

Palatal view of milled restorations fitted on 3D printed dies using Precision Model Resin at 50 microns.
5. Temporary Anterior Restorations
Material:
Premium Teeth Resin
Resolution:
50 microns
Important tips for a successful print and appliance use:
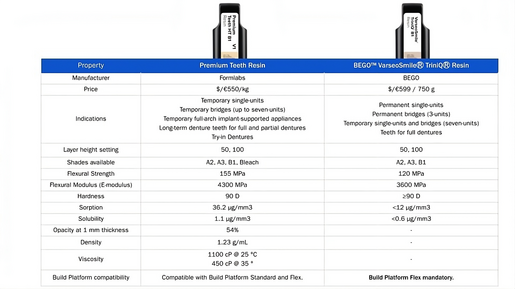
Formlabs has different materials available for the production of temporary and permanent restorations on the Form 4B. For temporary restorations there is Premium Teeth Resin and for both permanent and temporary restorations there’s BEGO™ VarseoSmileⓇ TriniQⓇ Resin.
These ceramic-filled resins differ in different points (which you can see in the table below) but one of them is their translucency. Given that the patient needed two provisional restorations in a context where the neighbouring teeth had two e-max veneers, the translucency of the material was a crucial factor. Premium Teeth Resin delivered realistic and functional temporary restoration for anterior teeth. The highlight of this material was its translucency that enabled it to esthetically integrate seamlessly with the rest of the smile.

The future of dentistry with 3D printing
For me, the successful integration of 3D printing into the DSD Clinical course highlights its transformative potential in modern dentistry. By combining advanced hardware, versatile materials and well-designed workflows, dental professionals can achieve unparalleled precision and efficiency. This hands-on experience not only equips clinicians with cutting-edge tools but also empowers them to elevate the standard of care they provide to their patients. There's no excuse to not go digital when the benefits for our patients are so clear and there is a significant amount of scientific evidence proving this.
As awareness of 3D printing grows and the technology continues to evolve, its role in dentistry will undoubtedly expand and offer new possibilities for innovation and improved patient outcomes. Though we have already mastered a certain level of ease of use as an industry, there will always be innovation and more to come. Collaborating with clinicians and institutions like DSD allows us to learn and explore next-generation solutions, bringing education and technology together to shape the future of dental care.
Follow us on Instagram, Facebook, and LinkedIn to stay updated on our course promotions and flash sales that we run during the year.