Tooth preparation.

By Luken De Arbeloa
⋅ 9 min read
⋅ Updated Jul, 2024
How many times have you calibrated your bur as precisely as possible, completed your preps with the utmost care and sent them to your lab, only to receive a request for more space?
This is a frustratingly common occurrence that not only causes stress as we wonder where we went wrong, but increases the time and number of appointments we need to dedicate to a case and can impact negatively on our patient’s experience.
If you’ve ever wondered why this happens and what you can do about it, in this article we will explain the three DSD models that can help put a stop to over and under prepping in your cases.
DSD Diagnostic Design: the three models that help you to plan, present and perform your cases
When you order a wax-up from your lab, you take analog impressions, send them to the lab and ask for a diagnostic wax up, and the lab adds wax over the patient’s actual situation. Can we diagnose using this? No, because it’s completely additive.
Perhaps your patient is a subtractive case but the lab can’t trim the model because then you can’t place a mock up as it won’t fit. This is where the three models come in.
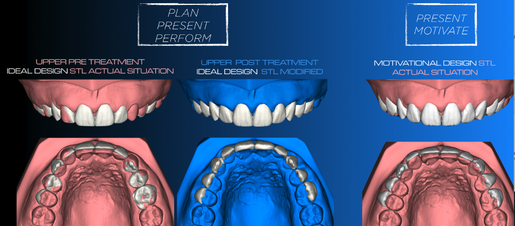
The three DSD models: the Ideal Diagnostic, the Ideal Post Treatment and the Motivational Mock up.
1. The ‘Ideal Diagnostic’
This is the ideal design. In the first image, the white is where we want the case to end up and the pink is the patient’s actual situation. When you look at this, you can see very clearly that the best way to solve this case is with ortho. This model is used for diagnosis but you can’t use it to place a motivational mock up. Imagine printing this: you take a silicone index and you place it in the patient’s mouth - it will look terrible: some areas with Bisacryl, some areas where it is actual teeth.
This model has three clear objectives:
1. Plan: Visualize the treatment plan to take clinical decisions
2. Present: Educate the patient about their treatment through images
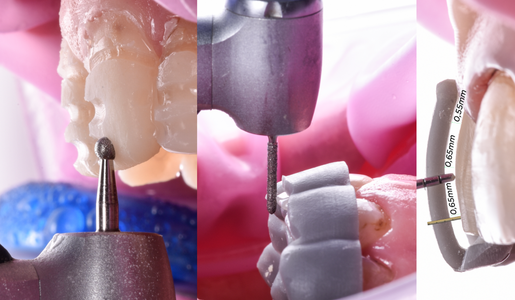
3. Perform: In the case of restorations, it will be our reference for the areas that we must reduce
This is used to make clinical decisions, not for motivation. It shows where you are and where you want to be, but how to get there is up to you: your knowledge, expertise and experience.

If you believe guided procedures could make clinical execution more predictable - with less stress, find out more.
2. The ‘Ideal Post Treatment’
In this image, we use blue because it’s not real. At the end of treatment the patient will look like this. The white is the same as in the first model but what’s changed is the actual situation of the patient. Why is this important? Because in the first model you can’t see if the result looks good, analyze if this is what you want, or evaluate the final occlusion, while in this second model it is clear.
This model has three clear objectives:
1. Plan: Visualize the treatment plan to make better clinical decisions
2. Present: Educate the patient about their treatment through images
3. Perform:
- In the case of restorations, it can be used as the technical mock up (the one you will place to guide your carving after having reduced the areas that are outside the ideal design, to then calibrate your burs and start the carving since it is a copy of the final result)
- It will also be the one you will use to place as a direct provisional
- It will be the guide for the final CAD design (same design but it will be adapted to the finishing lines of the preparation)
3. The ‘Motivational Mock up’
This model shows the same actual situation but a new design. For the Motivational Mock up, we transform the design in a completely additive way to show the design as accurately as possible. As the patient can’t conceptualize the first design, we need to do something that will look very similar that we can place in the patient’s mouth. We add volume to try and make it more bulky to show as accurately as possible the Ideal Diagnostic design.
This model has one clear objective:
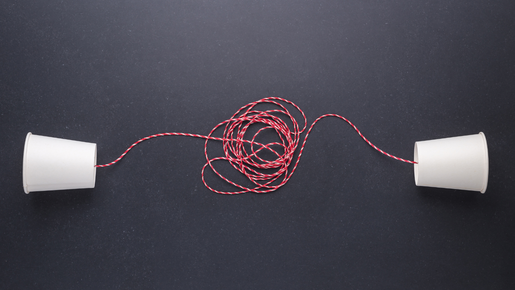
1. Present: Motivate the patient to open a communication channel in which they are more willing to listen to the treatment plan
2. Plan: Nothing
3. Perform: Nothing
If you send a model to a lab, this is the one they will usually do - but we can’t use it for decision making.
What effect do these models have on our prep?
So why is it that so many times, we calibrate the bur, do the prep as exactly as we can…but the lab still asks for more space? Because we are using the wrong design.
When we prep using the motivational design and the lab designs using the Ideal Diagnostic, they will be asking us for more space. It’s what often causes us to prep, and then prep more to avoid the lab asking us for more space.
Using the three models from DSD, you can diagnose very well, analyze the treatment plan, and then motivate and educate your patient – but knowing that the real final outcome will be very close to the Ideal Diagnostic.
Ideal Diagnostic vs Motivational Mock up prep: an example

A comparison between the Ideal Diagnostic and the Motivational Mock up designs for prep
In this image, the yellow is the ideal design and the white is the mock up. In this image, you can see how we take the yellow design and move it out slightly in the cervical area to simulate the crown lengthening so the patient can see it.
When you prep using the mock up, which is a completely additive design, you can see how far the bur is from the real situation. This is why the lab always requests more space. Instead, we need to do our prep using the Ideal design. This is now possible to see because using digital, we can create and view many different designs.
Can you ever prep using the Motivational Mock up? Only when the case is completely additive, which is around 5% of cases in the world.
Why is this so important?
Because often, we place mock ups without knowing how to execute the case. The struggle comes when a dentist places the mock up and the patient falls in love with the design, but the dentist doesn’t know how to make it a reality or is unaware of the problems they may encounter along the way.
That’s why we do the models in this order (which is the opposite of the traditional way): only when we know exactly how to execute the Ideal Diagnostic do we then use the design to produce the mock up to motivate the patient.
If you send a model to your lab and they do a bulky wax-up, you then place the mock-up and do the treatment, but when you start to execute many problems and issues start to appear because you are making decisions during treatment execution.
What are the steps in the workflow?
Everything starts with the treatment plan and digital treatment planning. That's why doing digital is so important: the only way to really see this type of information in order to get that accurate and predictable result is by doing digital and using the three models.
The initial step is to use the three models so we can see very clearly where we are where we want to be and set clear expectations. Then we translate this plan to reality.
Learn more about guided dentistry
If you are interested in learning where you could be implementing efficient and cost-effective solutions to reduce stress and save time during clinical execution, our online Guided Dentistry Certification can help you.
Find out more by exploring the certification now.

